Aeg-Electrolux E9971-4-M NORDIC R05 User Manual
Browse online or download User Manual for Ovens Aeg-Electrolux E9971-4-M NORDIC R05. Aeg-Electrolux E9971-4-M NORDIC R05 User Manual
- Page / 64
- Table of contents
- BOOKMARKS
- COMPETENCE E9971-4 1
- 1 Safety instructions 2
- 3 Useful tips and hints 2
- 2 Environmental information 2
- Contents 3
- Operating Instructions 5
- 3 Information on acrylamides 6
- 3 Note on enamel coating 6
- Disposal 7
- 2 Old appliance 7
- Description of the Appliance 8
- PROFI HOT AIR 9
- Oven Features 11
- Oven accessories 12
- LANGUAGE MENU 13
- TIME OF DAY 13
- Using the Rings 15
- Setting the heat setting 16
- Using the Oven 18
- ___ _________________ 19
- CONVENTIONAL 19
- –—OVEN FUNCTIONS 19
- Use of the oven functions 20
- Meat programmes 21
- 3 Cooling fan 23
- Non-stick accessories 26
- Meat Probe 27
- Inserting the meat probe 27
- 3 If OVEN FUNCTIONS should 28
- Removing the meat probe 29
- _ ___________________ 30
- POULTRY 2,5 KG 30
- --POULTRY 2,5 KG 30
- TURN-OVER MEAT 31
- MEATPROBE 31
- RECIPE MENU in overview 32
- _ ______ 33
- ___ ____ 33
- MEMORY MENU 35
- 280ûcþ þüþ1ü2.2ü8 36
- _________________ _ __ 37
- DAD’S PIZZA 37
- SETTINGS MENU 38
- Clock Functions 39
- 888ûcþ þüþ1ü4.3ü5 40
- 888ûcþ þüþ1ü4.3ü8 40
- 200ûcþ þüþ1ü4.3ü5 41
- 200ûcþÝÜÜÜþ1ü4.3ü5 41
- 200ûcþÝÞßàþ1ü5.0ü5 41
- 200ûcþÝÞßàþ1ü5.2ü5 42
- 200ûcþ þüþ1ü2.0ü5 43
- CHILD LOCK 44
- BUTTON LOCK 45
- Mechanical Door Lock 46
- Outside of the appliance 47
- Oven interior 47
- Accessories 47
- Fat Filter 48
- 888ûcþ þüþ1ü5.0ü5 49
- 888ûcþÝÜÜÜþ1ü5.0ü5 49
- Performing Pyroluxe cleaning 50
- PYROLUXE NORMAL 51
- Oven Shelf Runner 52
- Oven Lighting 53
- Oven door 55
- Oven door glass 57
- What to do if … 60
Summary of Contents
COMPETENCE E9971-4Built-In Electric OvenOperating Instructions
10Buttons Button Functionw To select oven functions.To move down and up in the menu.m¸To open the Options menu.To close the Options menu (press and ho
11Oven Features Oven steam vent The steam from the oven is fed di-rectly upwards via the duct in the rear of the cooking surface.Top heat and heating
12Oven accessoriesCombination shelf for telescopic runners For cookware, cake tins, roasts and grilled food.Oven shelf for non-stick For cookware, cak
13Before Using for the first timeSetting the language 1. When the appliance has been connected to the elec-trical supply, SPRACHE EINS-TELLEN - LANGUA
14Setting the clock1. TIME OF DAY lights up.In the clock display you see 12.00. 2. Using the or button, set the current time. 3. Confirm using t
15Using the Rings3Also refer to the operating instructions for your built-in hob. It con-tains important information on ovenware, operation, cleaning
16Setting the heat setting1. Switch on the appliance with the On/Off button.2. When getting up to heat/searing food, select a high heat setting. 3.
17Warming up times when cooking with the automatic warm up function3 When cooking with the appliance for the first few times, take careful note of how
18Using the OvenMenu operation in overview 3 The display only offers setting options that are possible with the cur-rent function after each operatio
19Setting an example oven function 1. Switch on the appliance us-ing the ON/OFF button. 2. Using the arrow buttons or select the oven func-tio
2Dear Customer,Please read these user instructions carefully and keep them to refer to later.Please pass the user instructions on to any future owner
20Use of the oven functionsThe oven has the following functions:Oven function ApplicationHeating element/fanPROFI HOT AIR For baking on up to three ov
21Meat programmesor Usage, Tables, Tips and RecipesYou will find practical information on the various oven functions, pro-grammes and automatic recipe
22Switching the Oven On and OffSelecting an oven function1. Switch appliance on using the ON/OFF button. 2. Using the arrow buttons or select
233 Cooling fanThe fan switches on automatically in order to keep the appliance’s sur-faces cool. When the oven is switched off, the fan continues to
24Heat indicatorHeating up indicator When the oven function has been switched on the four bars that slowly light up one after the other indicate how f
25Inserting the Combination Shelf, Baking Tray and Roast-ing PanInserting the baking tray or roasting pan Insert baking tray or or roasting pan on t
26Inserting/Removing the Grease FilterOnly use the grease filter when roasting to protect the rear heating elements from fat splashes. Non-stick acces
27Meat Probe3 When the meat probe is plugged in, the OVEN FUNCTIONS menu offers a choice of suitable oven functions and additional programmes for the
28Setting meat probe core temperatureTo switch the oven off when the temperature at the centre of a roast reaches a core temperature set by you.There
29Removing the meat probe1 Warning: The meat probe is very hot. There is a risk of being burned when removing the plug and the tip of the meat probe.1
3ContentsOperating Instructions. . . . . . . . . . . . . . . . . . . . . . . . . . . . . . . . . . . . . 5Safety instructions. . . . . . . . . . . . .
30Automatic programmesIn addition to the oven functions for individually setting baking and roasting, you have the option of working with various auto
31 3. With the POULTRY meat pro-gramme, please turn the food if an acoustic signal sounds and the instruction TURN-OVER MEAT is in the text line.When
32OptionsRECIPE MENU in overview RECIPE MENUwm¹BAKING RECIPESLEMON SPONGE CAKESWEDISH CAKEROASTING RECIPESSPONGE CAKECHEESE CAKEFRUIT CAKESTREUSEL PLA
33BAKING RECIPES and ROASTING RECIPES 3 For this function, use the recipes supplied in the booklet “Tables, Tips and Recipes”. This function offers op
34 6. An acoustic signal will sound when the cooking time has finished. – “00:00:” flashes in the clock display and the symbol flashes.– The oven hea
353 With the recipes POWDER CAKE and FROZEN PIZZA using the or buttons, the suggested temperture can be increased or decreased by 10°C.In the categ
36 5. Using the OK button, se-lect the suggested menu op-tion STORE MEMORY.The next free memory posi-tion is displayed. 6. Select using the OK but
37Calling up settings for “Personal Recipes”1. Switch on the appliance with the ON/OFF button. 2. Using the arrow button select saved recipe.3 Yo
38SETTINGS MENU3 Independent of the current use of the oven, you can change various base settings. These remain permanently set, until they are change
39Adjusting SETTINGS MENU1. Using the OPTION button, open the Options menu.2. Using the arrow buttons or select the menu option SETTINGS MENU.3
4Clock Functions . . . . . . . . . . . . . . . . . . . . . . . . . . . . . . . . . . . . . . . . . . . . . . . . . 39Additional functions . . . . . .
403 The clock functions display shows the period of operation for the se-lected oven function, if none of the clock functions MINUTE MINDER , DURATION
41DURATION1. Select oven function and temperature. 2. Press the SELECTION but-ton repeatedly until DURA-TION and the symbol is displayed. 3. Using
42END1. Select the oven function and temperature. 2. Press the SELECTION but-ton repeatedly until END and the symbol are displayed. 3. Using the
43DURATION and END combined3 DURATION and END can be used simultaneously, if the oven is to be switched on and off automatically at a later time.1
44Additional functionsCHILD LOCK for the ovenAs soon as the CHILD LOCK is activated, the appliance cannot be oper-ated.Switching on the CHILD LOCK 1.
45BUTTON LOCKTo ensure that all oven functions set are not accidentally altered.Switching on BUTTON LOCK 1. If necessary, switch on the appliance usin
46Mechanical Door LockWhen the appliance is delivered, the door lock is deactivated. Activate the door lockPull the safety catch forwards until it loc
47Cleaning and Care1Warning: For cleaning, the appliance must be switched off and cooled down.Warning: For safety reasons, do not clean the appliance
48Fat Filter1. Clean the fat filter in hot water and washing up liquid or in the dish-washer.2. Badly burned on soiling can be removed by boiling the
49Cleaning function for oven cleaner sprayWith the cleaning function for oven cleaner spray you can pre-heat the oven to the optimum effective tempera
5Operating Instructions1 Safety instructions5This appliance conforms with the following EU Directives:– 73/23/EEC dated 19.02.1973 Low Voltage Directi
50The time the oven cleaner spray needs to be left to work depends on the manufacturer’s instructions.3 The acoustic signal can be deactivated by pres
51 6. Using the arrow buttons or select the length of Pyroluxe.– PYROLUXE LIGHT for a light degree of soiling (2:15),– PYROLUXE NORMAL for a nor
52Oven Shelf RunnerThe shelf support rails on the left and right hand sides of the oven can be removed for cleaning the side walls.Removing the shelf
53Cleaning the Oven Shelf RunnerClean oven shelf runners with hot water and washing up liquid.1 Important: The oven shelf runners cannot be cleaned in
54Changing side oven light/Cleaning glass cover1. Remove the left shelf support rail. 2. Remove the glass cover with the aid of a narrow, blunt implem
55Oven doorFor easier cleaning of the oven interior the oven door of your appliance can be taken off its hinges.Removing the oven door from its hinges
56Hanging the oven door back on its hinges1. From the handle side take hold of the oven door with a hand on each side and hold at an angle of approx.
57Oven door glassThe oven door is fitted with four panels of glass mounted one behind the other. The inner panels can be removed for cleaning.1 Import
585. Take hold of the door glass panels on their upper edge one after the other and take them out of the guide by pulling them upwards. Cleaning the d
593 On the open side of the door trim (B) there is a guide bar (C). This must be pushed between the outer door panel and the guide corner (D). The cli
63 Information on acrylamidesAccording to the latest scientific knowledge, intensive browning of food, especially in products containing starch, can c
60What to do if …Problem Possible cause RemedyThe cooking zones are not functioning.Refer to the operating instructions for the built-in cooking surfa
61 If you are unable to remedy the problem by following the above suggestions, please contact your dealer or the Customer Care De-partment.1 Warning!
62IndexAAccessories . . . . . . . . . . . . . . . . . . . . . . .12, 25Automatic warm up function . . . . . . . . . . . 16BBaking tray . . . . . . .
63ServiceIn the event of technical faults, please first check whether you can remedy the problem yourself with the help of the operating instruc-tions
From the Electrolux Group. The world´s No.1 choice.The Electrolux Group is the world´s largest producer of powered appliances for kitchen, cleaning an
7Disposal2Packaging materialThe packaging materials are environmentally friendly and can be recy-cled. The plastic components are identified by markin
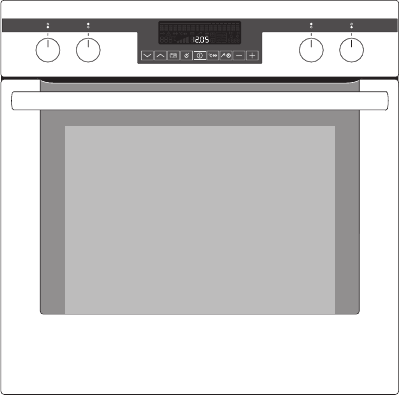
8Description of the ApplianceGeneral Overview Full glass doorOven displaysand buttonsDoor handleHob Cooking Zone Control Knobs Hob Cooking Zone Contro
9The electronic oven controlsIndicators Menu status barIn the menu status bar the current position within a menu is shown by a flashing bar.When the m
Related products and manuals for Ovens Aeg-Electrolux E9971-4-M NORDIC R05
 (32 pages)
(28 pages)
(52 pages)
(32 pages)
(32 pages)
(32 pages)
(40 pages)
(32 pages)
(32 pages)
(28 pages)
(52 pages)
(32 pages)
(32 pages)
(32 pages)
(40 pages)
 (48 pages)
(60 pages)
(32 pages)
(64 pages)
(32 pages)
(28 pages)
(48 pages)
(60 pages)
(32 pages)
(64 pages)
(32 pages)
(28 pages)
© 2020, manymanuals.com. All rights reserved. | 2.321 s |
 Manymanuals.com
 Manymanuals.de
 Manymanuals.fr
 Manymanuals.it
 Manymanuals.pl
 Manymanuals.cz
 Manymanuals.es
 Manymanuals-pt.com
Comments to this Manuals