Aeg-Electrolux KB9820E-M User Manual Page 1
Browse online or download User Manual for Ovens Aeg-Electrolux KB9820E-M. Aeg-Electrolux KB9820E-M User Manual
- Page / 72
- Table of contents
- BOOKMARKS
- COMPETENCE KB9820E 1
- 1 Safety instructions 2
- 3 Useful tips and hints 2
- 2 Environmental information 2
- Contents 3
- Operating Instructions 5
- 3 Note on enamel coating 6
- Disposal 7
- 2 Old appliance 7
- Description of the Appliance 8
- Oven Features 9
- Oven Accessories 9
- Initial cleaning 11
- Getting to know the appliance 11
- Operating the Oven 12
- 3 General instructions 12
- 3 Cooling fan 14
- Oven Functions 15
- Steam Cooking Functions 17
- Additional functions 19
- Memory function 20
- Other Functions 26
- Switching off the display 26
- Child safety device 26
- Button Beep 27
- Usage, Tables and Tips 28
- Steam Cooking 29
- Steam Cooking table 29
- Cooking in succession 31
- Cooking in sucession table 31
- Interval Cooking 32
- Interval Cooking table 32
- Baking table 35
- 1) Pre-heat the oven 36
- 1)Pre-heat the oven 37
- Tips on Baking 38
- Table for Bakes and Gratins 39
- Frozen Ready Meals Table 39
- Roasting 40
- Roasting table 40
- * Pre-heat the oven 41
- Low temperature cooking 42
- Low Temperature Cooking Table 42
- Single Economy Grill 43
- Grilling table 43
- Rotitherm Roasting 44
- Defrosting 45
- Defrosting table 45
- Making preserves 47
- Preserves table 48
- CLEANING (Cleaning programme) 49
- WHITE BREAD 51
- FILLET OF FISH (700g) 53
- TROUT 250-300 G 53
- PIZZA (4 round Ø 28cm) 54
- QUICHE LORRAINE 55
- CHICKEN 1200 G 56
- RACK OF VEAL (for 4-6 people) 56
- Outside of the appliance 58
- Oven interior 58
- Accessories 59
- Grease Filter 59
- Side rails 60
- Replacing the side rails 61
- Steam generation system 62
- Oven lighting 63
- Oven Door 64
- What to do if … 65
- Installation Instructions 66
- Service and Spare Parts 71
Summary of Contents
COMPETENCE KB9820EBuilt In Fan / Steam OvenInstallation and operating instructions
10Before using for the first timeSetting and changing the current time3 The oven only operates when the time has been set.When the appliance is connec
11Initial cleaningClean the oven before using it for the first time.1 Important: Do not use caustic or abrasive cleaning agents! These can damage the
12Operating the OvenThe Electronic Oven Control 3 General instructions• Always switch the appliance on first by pressing the On/Off button.• When the
13Selecting the oven function1. Switch on the oven with the On/Off button.2. Press the or button repeat-edly until the desired oven function appea
14Switching off the oven Switch off the appliance using the On/Off button.3 Cooling fanThe fan switches on automatically in order to keep the applian
15Oven FunctionsThe oven has the following functions:Oven function UseHeating element/fanSteam Cooking For vegetables, potatoes, rice, pas-ta or other
16Inserting the shelf and the baking trayInserting baking tray: The tray has a small bulge to the left and right. This bulge serves as an anti-tip de
17Steam Cooking Functions1 Important:The Steam Cooking functions must always be set in con-junction with the clock functions Cook time or End time (
185. Using the On/Off button, switch off the signal and the oven. After the oven has cooled down, soak up any remaining water from the steam generato
19Additional functionsBaking and Roasting Programmes3 Use the pre-set recipes for this function.Selecting the programme1. Switch the oven on using the
2Dear Customer,Please read these user instructions carefully and keep them to refer to later.Please pass the user instructions on to any future owner
20Memory functionThe Memory function can be used to save a setting which is fequently used.1. Set oven function, temperature and if necessary the cloc
21Clock Functions CountdownTo set a countdown. A signal sounds after the time has elapsed.This function does not affect the operation of the oven.Cook
22Countdown1. Press the Clock Functions button repeatedly until the symbol for Countdown flashes. 2. Set the desired Countdown time us-ing the or
23Cook time1. Select oven function and using or button select temperature. 2. Press the Clock Functions button repeatedly until the symbol for Co
24End time1. Select oven functions and using or button select temperature. 2. Press the Clock Functions button repeatedly until the symbol for En
25Cook time and End time combined3 Cook time and End time can be used simultaneously, if the oven is to be switched on and off automatically at a
26Other FunctionsSwitching off the display2 You can save energy by switching off the display.Switching off the display1. If required, switch off the a
27Deactivating the child safety device1. If necessary, switch on the appliance using the On/Off button.2. Press and hold the Baking/Roasting Programme
28Usage, Tables and TipsCooking with steamFor steam cooking, use the oven functions Steam Cooking or In-terval Cooking .1 Warning: When cooking with
29Steam CookingThe Steam Cooking method of preparation is suitable for all types of food, fresh or frozen. It can be used for cooking, warming, defro
3ContentsOperating Instructions. . . . . . . . . . . . . . . . . . . . . . . . . . . . . . . . . . . . . 5Safety instructions. . . . . . . . . . . . .
30The times given are for guidance only, they will vary depending upon size and number.Blanching beans 250 96 2 20-22Tender veal ham 1000 g 700 96 2 5
31Ventitherm ® Fan Operated Cooking and Steam Cooking in successionBy combining Ventitherm ® Fan Operated Cooking and Steam Cooking one after the ot
32Interval Cooking The Interval Cooking method of preparation is particularly suitable for starting the roasting of large joints of meat and for defr
33Cut up a whole roast before warming.The times given are for guidance only, they will vary depending upon size and amount.BakingOven function: Ventit
34General instructionsWith Ventitherm ® Fan Operated Cooking you can also bake two cakes at the same time in tins placed next to each other on the sh
35Baking tableBaking on one oven levelType of bakingVentitherm ® Fan Operated CookingOven levelTemperature°CTimeHr: Mins. Baking in tinsRing cake or b
36Unleavened bread 2 2301)0:10-0:20Tarts (CH) 2 190-210 0:35-0:50 BiscuitsShort pastry biscuits 2 160-180 0:06-0:20Viennese whirls 2 180 0:10-0:40Bisc
37Baking on more than one oven level 1)Pre-heat the oven Type of bakingVentitherm ® Fan Operat-ed CookingTempe-rature in °CTimeHours: Mins.Shelf posi
38Tips on BakingBaking results Possible cause RemedyThe cake is not browned enough un-derneathWrong oven level Place cake lowerThe cake sinks (be-come
39Table for Bakes and Gratins Frozen Ready Meals TableDishVentitherm ® Fan Operated CookingShelf position Temperature °CTimeHr: Mins.Pasta bake 1 180-
4Baking . . . . . . . . . . . . . . . . . . . . . . . . . . . . . . . . . . . . . . . . . . . . . . . . . . . . . . . . . 33Baking table . . . . . . .
40RoastingOven function: Ventitherm ® Fan Operated CookingInsert the grease filter when roasting!Ovenware for roasting• Any heat-resistant ovenware is
41* Pre-heat the ovenBeefPot roast (1000-1500 g) 1 180-200 2:00-2:30Roast beef or fillet, per cm. of thickness1 210-230*0:06-0:09per cm. of thicknessV
42Low temperature cookingOven function: Low temperature cooking .With the Low temperature cooking oven function, meat be-comes beautifully tender and
43Single Economy GrillOven function: Single Economy Grill with maximum tempera-ture setting1 Important: Always grill with the oven door closed.• When
44Rotitherm RoastingOven function: Rotitherm Roasting DishTempe-raturein °CTrayGrill shelfGrilling time in minutesTurn after … minutesoven levelChicke
45DefrostingOven function: Defrost/Drying (30°C temperature setting)• Unwrap the food and place it on a plate on the oven shelf.• Do not cover with a
46DryingOven function: Defrost/Drying• Use with trays covered with greaseproof paper or baking parchment.• You will get a better result if you turn th
47Making preservesOven function: Ventitherm ® Fan Operated Cooking• For preserving, use only commercially available preserve jars of the same size.• J
48Preserves tableThe times and temperatures for making preserves are for guidance only.PreserveTemperaturein°CCooking time until simmeringin mins.Cont
49Programmed Functions and RecipesThe appliance has 12 programmed functions and recipes, which can be selected one after the other using the Baking/Ro
5Operating Instructions1 Safety instructions5This appliance conforms with the following EU Directives:– 73/23/EEC dated 19.02.1973 Low Voltage Directi
50RecipesVEGETABLE 500-1000G (plate of vegetables)Cookware:Any kind of cookware that is heat-resistant to at least 100°C can be used.Ingredients:– 400
51Method:Peel potatoes, cut into approx 3mm thick slices and layer them in a grating dish. Season with salt, pepper, nutmeg and garlic.Mix milk and cr
52ROLL PER 40 G (Party rolls 40g)Ingredients:– 500 g flour, type 405– 20 g fresh yeast or 1 packet of dried yeast– 300 ml water– 10 g saltMethod:Plac
53FILLET OF FISH (700g)Ingredients:– 700 g pike-perch fillet or sea trout fillet, cubed– 100 g Emmental, grated– 200 ml cream– 50 g breadcrumbs– Salt,
54PIZZA (4 round Ø 28cm)Method:Tomate sauceIngredients for the dough:– 500 g flour, type 405– 250 ml water– 20 g yeast– 1egg– 2 tblsp olive oil– 1tsp
55Bake with pre-heating 230°CQUICHE LORRAINEIngredients for the pastry:– 250 g flour, type 405– 125 g butter– 60 ml water– 1tsp salt– A little pepper
56CHICKEN 1200 GIngredients:– 1 chicken (1000 - 1200 g)– 2 tblsp groundnut oil– Salt, pepper, paprika, curry powderMethod:Wash the chicken and dry it
57Cooking Pre-heat 120°C (10 mins.)Low temperature cooking 80°C• Core temperature 65°CWARMING (Meals for 4-6 people)Cookware:Any kind of cookware tha
58Cleaning and care1Warning: For cleaning, the appliance must be switched off and cooled down.Warning: For safety reasons, do not clean the appliance
59Oven roof with catalytic self-cleaning surface(rough, porous surface)The oven roof has a catalytic self-cleaning surface, from which small food depo
63 Information about acrylamides According to the latest scientific research, intensive browning of food, especially in products containing starch, ma
60Side railsFor cleaning of the sides of the oven, the left and right side rails can be removed from the oven. Taking out the side rails1. Loosen the
61Replacing the side rails1. Set the rails in the rear hook and press against the screw hole. 2.Insert the screw and tighten.
62Steam generation system1 Important: Wipe the steam generator dry after each use. Soak up wa-ter with a sponge.3 Remove any lime residue with water a
63Oven lighting1 Warning: There is a danger of electric shock! Prior to changing the oven light bulb:• Switch off the oven!• Disconnect from the elect
64Oven DoorThe door of your appliance may be removed for cleaning.Removing the oven door1. Open the oven door completely.2. Completely fold back the c
65What to do if … If you are unable to remedy the problem by following the above suggestions, please contact your local Service Force Centre.1 Warning
66Installation Instructions1Attention: The new appliance may only be installed and connected by a registered expert.Please comply with this. If you do
67 592567388520min.560380-383min.550202523751359220388 388min.560380-383min.55059256738025237513
68 388min.560380min.55059256738038859220388380-38325237513alternativ
7Disposal2Packaging materialThe packaging materials are environmentally friendly and can be recy-cled. The plastic components are identified by markin
70
71Service and Spare PartsIf the event of your appliance requiring service, or if you wish to pur-chase spare parts, please contact Service Force by te
From the Electrolux Group. The world´s No.1 choice.The Electrolux Group is the world´s largest producer of powered appliances for kitchen, cleaning an
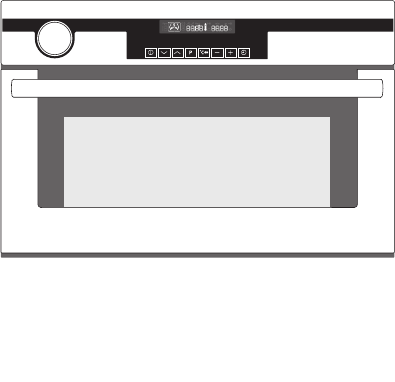
8Description of the ApplianceGeneral Overview Control Panel Full glass doorControl panelDoor handleOven displayFunction buttonsOvenWater drawer
9Oven Features Oven AccessoriesCombination shelf For dishes, cake tins, items for roasting and grilling.Baking tray For cakes and biscuits.Grill heati
More documents for Ovens AEG Electrolux KB9820E-M


Related products and manuals for Ovens Aeg-Electrolux KB9820E-M
 (40 pages)
 (72 pages)
(52 pages)
(40 pages)
(72 pages)
(52 pages)
(40 pages)
 (32 pages)
(40 pages)
(56 pages)
(44 pages)
(40 pages)
(52 pages)
(44 pages)
(28 pages)
(48 pages)
(48 pages)
(40 pages)
(44 pages)
(44 pages)
(32 pages)
(40 pages)
(56 pages)
(44 pages)
(40 pages)
(52 pages)
(44 pages)
(28 pages)
(48 pages)
(48 pages)
(40 pages)
(44 pages)
(44 pages)
© 2020, manymanuals.com. All rights reserved. | 1.434 s |
 Manymanuals.com
 Manymanuals.de
 Manymanuals.fr
 Manymanuals.it
 Manymanuals.pl
 Manymanuals.cz
 Manymanuals.es
 Manymanuals-pt.com
Comments to this Manuals